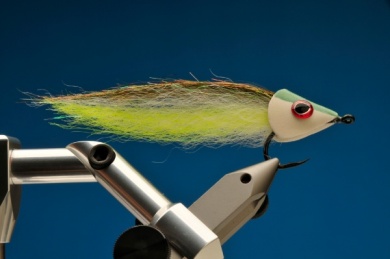
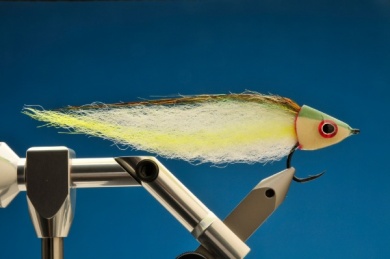
In general, we do not find many minnow imitations that can be considered as realistic flies, those flies that usually resemble amazing insects and that allow the fly-tier to show his skills and defy the senses. Nevertheless, rewarding experiments in clear waters, in Argentina and other countries, ha View more...In general, we do not find many minnow imitations that can be considered as realistic flies, those flies that usually resemble amazing insects and that allow the fly-tier to show his skills and defy the senses. Nevertheless, rewarding experiments in clear waters, in Argentina and other countries, have proven to me that some realistic details in our streamers can be the starting point to testing effective and interesting variants. The head, gill plates and eyes of fish are clearly visible, and fly-tiers have always wanted to add these to their patterns in many ways.Since the Carrie Stevens days, feathers from different places have been used to accomplish this, Jungle Cock is highly regarded to imitate eyes and details of the head in small and medium sized streamers. Here, we will not concentrate on feathers (still irreplaceable) and we will make use of synthetic materials that have special uses in modern fly-tying.The Foam Head Baitfish is very interesting because we can shape the head and gills of any kind of fish by using foam, and the rest of the fly will remain flexible; giving the fly great movement, transparency and good silhouette in the water.The idea comes from a Boston tier called Masahito Sato who specializes striped bass fishing in the sea. I have modified the way to shape the foam head and how to stick it on the hook so it’s easier to tie, because the original process (gluing the head with epoxy) is not as practical.We can alter the size and color of this fly to resemble almost every fish that hunters prey on. The perfect silhouette achieved, that does not change when wet, makes this fly a serious killer in some situations, like when golden dorados are selectively hunting for smaller fish .
Move the mouse over the image to zoom in the fly.
Touch the image to zoom in the fly.

List of materials
Tying MaterialsHooks: any short hook for sea fishing. The pictures show a Daiichi 3111, Black Ace, 3/0 size.Thread: transparent nylon. 0, 10 mm thick approximately.Wing (body of the minnow): SF fibres. Charteuse, white, grey and olive. At the back, olive Angel Hair or similar. I have tied great minnows and others that worked perfectly by changing the SF color and the head paint. Also attractor patterns of different colors. Feel free to try and test different variants.Head: White foam, 2mm thick, View more...Tying MaterialsHooks: any short hook for sea fishing. The pictures show a Daiichi 3111, Black Ace, 3/0 size.Thread: transparent nylon. 0, 10 mm thick approximately.Wing (body of the minnow): SF fibres. Charteuse, white, grey and olive. At the back, olive Angel Hair or similar. I have tied great minnows and others that worked perfectly by changing the SF color and the head paint. Also attractor patterns of different colors. Feel free to try and test different variants.Head: White foam, 2mm thick, cut and painted with nail varnish or markers. When it is finished, the paint is covered with a fine layer of 30 minute drying epoxy.Eyes: 3D or similar. Jurassic Eyes by Montana Files are very interesting for this fly, these have three colors and have an oval-shaped eye pupil that adds a special character to the finished fly.
Steps
Step 1
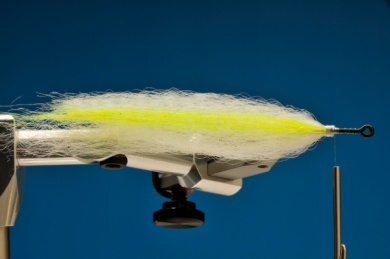
With the transparent nylon, make a base of X-style turns and cement them with some cyanoacrilate so that the thread is firm against the hook. This will avoid the fly from twisting. Once the cyanoacrilate is dry, we should tie a fluorescent yellow SF bundle but only half way. Then, take the part of the bundle -that pointed towards the eye- to the back, and make some more turns. This colorful bundle makes the the inner wing of the fly and is then covered by other bundles, but it comes back to lif View more...With the transparent nylon, make a base of X-style turns and cement them with some cyanoacrilate so that the thread is firm against the hook. This will avoid the fly from twisting. Once the cyanoacrilate is dry, we should tie a fluorescent yellow SF bundle but only half way. Then, take the part of the bundle -that pointed towards the eye- to the back, and make some more turns. This colorful bundle makes the the inner wing of the fly and is then covered by other bundles, but it comes back to life when the fly is wet.
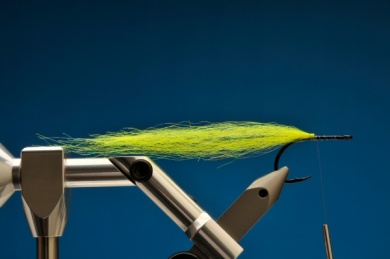
Step 2
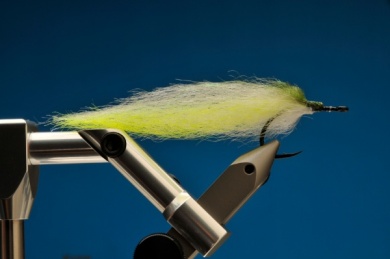
Tie a bundle of white SF to make a side of the fly. You should do the same for the other side so the body of the minnow is shaped. (It’s a funny thing to keep calling “the wing” of a streamer what we should call “the body” of the fish; fly-fishing tradition things). Don't use too many fibers for each bundle, if twisted its diameter should be that of a toothpick. It’s easier to add fibers than to take them out. View more...Tie a bundle of white SF to make a side of the fly. You should do the same for the other side so the body of the minnow is shaped. (It’s a funny thing to keep calling “the wing” of a streamer what we should call “the body” of the fish; fly-fishing tradition things). Don't use too many fibers for each bundle, if twisted its diameter should be that of a toothpick. It’s easier to add fibers than to take them out.
Step 3
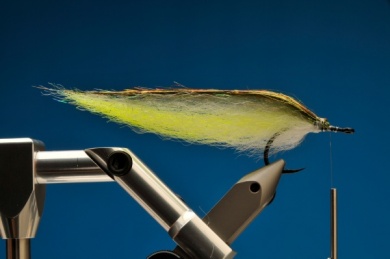
On the upper side of the fly we should tie a grey SF bundle, bending it to make the minnow’s back. Then, do the same with another olive bundle. Tie and trim, take the fly from the vise and shape the body trimming the fibers.
Step 4
Set the thread again and add some Angel Hair or similar material at the back of the fly. You can use peacock herl but it lasts less than synthetics. The Angel Hair must get to the tail of the fly, that is why we cut the body before (if not, it would have been very complicated to shape the body without cutting the back).
Step 5
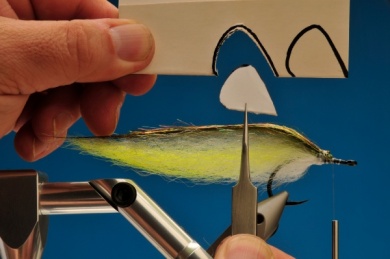
With a piece of fine folded cardboard, draw the mold of the head to use later to cut the foam. In the picture we see the drawing and the cardboard. Use a marker to trace the foam and a long scissors to cut. We can also place the stencil or template on the foam and cut around it. I cut the template and the foam, both in half. Then place the template on the foam so that the bent parts match and cut the foam with paper scissors. This way, I get a perfectly symmetric and even head. View more...With a piece of fine folded cardboard, draw the mold of the head to use later to cut the foam. In the picture we see the drawing and the cardboard. Use a marker to trace the foam and a long scissors to cut. We can also place the stencil or template on the foam and cut around it. I cut the template and the foam, both in half. Then place the template on the foam so that the bent parts match and cut the foam with paper scissors. This way, I get a perfectly symmetric and even head.
Step 6
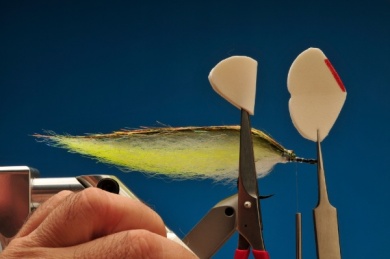
Fold the head in half; glue just the edge with cyanoacrilate without reaching the tip. The picture shows a glued head and another one that has not been glued, a red line shows where it should be glued.
Step 7
Paint the inside of the head with some slow drying cyanoacrilate (gel, for example, is slower) and carefully insert the head so it goes up to the wing and the foam tip behind the hook eye. At the same time, tightly press the head while evenly placing the wing fibers up and down. This way, the head sticks the fibers to the hook and body, making an enduring durable piece.Finally, use nail varnish to paint the head according to the characteristics of the fish to be imitated. It’s better to apply View more...Paint the inside of the head with some slow drying cyanoacrilate (gel, for example, is slower) and carefully insert the head so it goes up to the wing and the foam tip behind the hook eye. At the same time, tightly press the head while evenly placing the wing fibers up and down. This way, the head sticks the fibers to the hook and body, making an enduring durable piece.Finally, use nail varnish to paint the head according to the characteristics of the fish to be imitated. It’s better to apply first some layers of pearled enamel, letting it dry before making the final details. Once dry, add the eyes and cover everything with a fine layer of 30-minute dry, or more, epoxy. We have to spin the fly if we use this kind of epoxy. The advantage of these is that they do not turn yellowish with time, as the 5-minute ones do.
